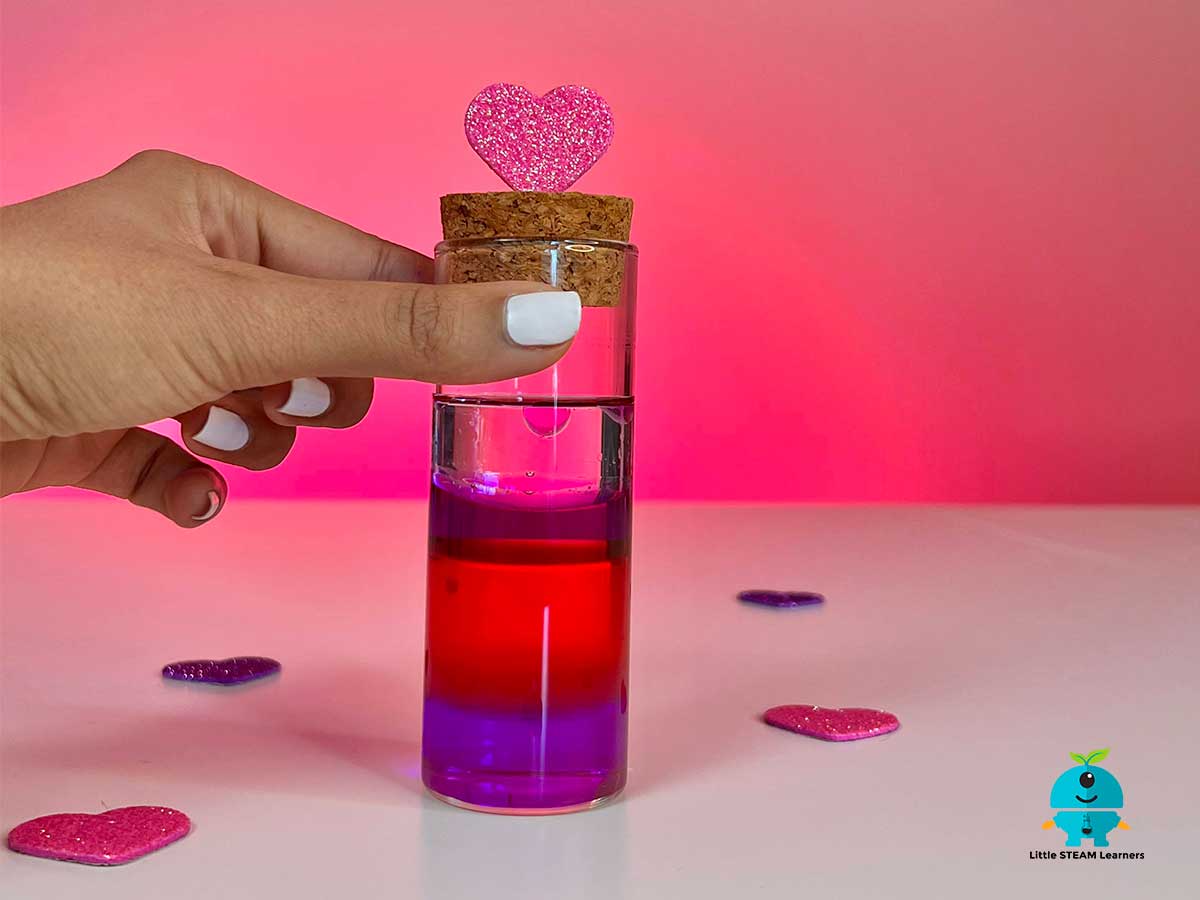
Valentine’s day is around the corner, this means it is time to cook up some love potions. This Valentine’s Day science experiment is a simple twist to a popular experiment called rainbow in a jar.
Through this science experiment little learners are provided with an opportunity to explore concepts like density and practice their fine motor skills through pipetting. Though we made ours with valentine colours in mind, this activity can be done for any season or occasion, and with any colours of your choice, so it is a great year-round activity.
Let’s get brewing!
How to brew Cupid’s Love Potion
What you need:
- Tall and narrow clear bottle, jar, glass or a plastic test tube
- Concentrated sugar solution or corn syrup
- Dish soap or hand soap
- Water
- Baby oil
- Rubbing alcohol
- Food coloring or concentrated watercolours (red, pink, purple)
- A sharpie (to colour the alcohol, we used purple)
- Pipettes, syringe, or baster
How to:
Watch our demonstration video, gather your supplies, and follow our easy how-to explanation below. An explanation of how it works is also included below.
Step 1: Create a sugar solution by adding a lot of sugar to some water. The amount will depend on the size of your container. We used 50 ml of water and 8 tsps. of sugar to create our sugar solution. Add one spoonful at a time, stir and wait until it is entirely dissolved before you add the next spoonful. As you add sugar, you may notice that it takes longer for the sugar to dissolve. That is good. This is how we create a saturated sugar solution. Once done, add a few drops of food colouring. We added purple.
Step 2: Using a pipette, pour the purple concentrated sugar syrup or corn syrup into the bottle.
Step 3: For the next layer, we used some soap. We used clear hand soap, and added some pink food colouring and gently mixed the colour in. You can use pre-coloured soap as well like purple lavender soap.
Step 4: Using a pipette, pour the soap into the bottle. The key to creating beautiful layers is pour your liquids very slowly.
Step 5: After the soap, comes coloured water. We added red coloured water slowly as our third potion layer.
Step 6: The next layer is baby oil. We did not have a oil based food colouring so we left the baby oil as is. Since oil and water do not mix, this one is the easiest to pour. However, we still suggest you pour the oil slowly as the movement could cause the bottom layers to mix.
Step 7: Our last layer is rubbing alcohol or hand sanitizer. To colour it we used a sharpie marker because they are alcohol based. We used a purple sharpie. Open the sharpie, stir it in the rubbing alcohol and watch the ink leave from the pen and into the rubbing alcohol. It was quite mesmerizing to watch.
Step 8: Slowly top off your love potion with the rubbing alcohol. Once done, add a cap. We used hand sanitizer and it ended up creating a layer under the oil instead of above it. Though it did not become our top most layer, it was pretty cool to watch hand sanitizer bypass the oil and create a layer under it.
The STEAM behind the fun:
The magic behind this science experiment is density and polarity. Let’s look at density first.
Density is the measure of how much mass is in a given volume. Every liquid has a density. Any liquid with more mass per volume will have a higher density. So, if the mass increases but the volume stays constant then the density will increase. Density is also how tightly packed the “stuff” making up the material is in a given volume. In the case of our experiment, the lighter liquids like baby oil and rubbing alcohol were less dense than the heavier liquids like water, soap, and corn syrup. This means oil and rubbing alcohol has less packed “molecules” than water.
Water has a density of 1g/ml. All objects or liquids like the baby oil and rubbing alcohol, that have a lower density, will always float on water. Objects or liquids like corn syrup and soap are denser than water, they have a higher density, as such they will always sink in water.
Now if we stirred our love potion, we would notice that everything mixes up except for oil. This is because of something called polarity. Particularly, Polarity of water.
Like magnets, water molecules have polarity, meaning, one end of a water molecule is positive, and the other is negative. As such water molecules are called polar molecules. And just like a magnet, the opposite polarity like each other, so water molecules are attracted to each other and other polar molecules.
Oil on the other hand only has a negative charge, and as such is a non-polar molecule. Since polar molecules only like polar molecules, only liquids like the sugar water and soap can dissolve in water. Whereas oil will not mix with a polar molecule. Pretty neat if you ask me!
Explore further:
- Test different liquids around the house such as honey, milk, juice, olive oil etc., to see if they are more or less dense than water
- Test objects to see if they will sink (more dense than water) or float (less dense than water) in water
We love simple experiments that you can do at home and learn complex concepts. Explore and expand on the learning by making a hypothesis and testing different liquids. We hope you try out this simple activity and watch the magic of science help you create fun potions. Happy brewing!


0 Comments